Computer Programming Recipes for Technical Math Nerds
Chastity White Rose
Preface
You would not know it by looking at me, but I have been computer programming as a hobby since I was 14 years old. My first programming language was QBASIC. It was a language and a program for interpreting that language that ran on MS-DOS. However, the usage of this language has diminished in use over time because it does not run without an emulator or modern BASIC language dialects meant to mimic it.
However, I moved to the C Programming Language as my main computer language. I have dabbled in Java, Javascript, Lua, Perl, Python, and the beast known as C++. However, of all these languages, C remains my native language because of how simple it is to remember. In spite of its quirks, C is what I recommend to a beginner not in spite of its limitations but because of them! Therefore, most of the recipes in this code cookbook will be in the form of C source code.
But this book will contain more than just the C language. There are times when other languages such as Bash, HTML, Markdown, and maybe even Lua or Python will just make a lot more sense in the context of what is being done.
For example, computer programming is used to create art, web pages, books, and video games. However, programming is also hard work and a lonely pursuit because almost nobody understands it except those of us who are called to this sacrificial art of communicating with a computer.
That being said, my computer understands what I mean better than most humans do. The purpose of this book is to archive some of the best programs I have written, and yet at the same time, are simple enough to share in only one or two pages.
This project began as an effort to save all my work so that it is not lost. I also hope that new generations of computer programmers can learn something from my 20+ years of experience as a C programmer.
Introduction
I got my start in the world of computer programming because I first loved numbers. I am the stereotype of an autistic savant who sees everything as a number. If you like numbers, my hope is that my recipes for generating number patterns will be of some use to you.
And if you don’t like numbers, then you probably won’t do well as a computer programmer because everything is a number in the context of a computer. The size, shape, and color of every text or picture element in the video games you play were at one point written into the code by one or more programmers who probably were not paid enough for the work that went into their craft!
But before I begin sharing my code recipes with you, there is something I need to do before you can fully enjoy the experience. You will want to install a C compiler on your computer!
If you are using Debian or Ubuntu Linux, installing the GCC compiler is as simple as sudo apt install gcc. However, I expect that most of my readers have a computer with the Windows operating system installed since the computer was purchased.
Don’t worry, you can still follow along! When I bought my Windows 11 laptop, I set up scoop to be my command line installer. Then I installed gcc so that I can always have it available from the command line on Windows just like I could in Linux.
scoop install gcc
There are other ways to install GCC on Windows. However, all of them will be giving the the result of having the ability to type gcc into the terminal or console to compile and run your C code.
Once it is installed correctly, you can enter gcc and get the message:
gcc: fatal error: no input files
compilation terminated.
But that is okay! We are going to give it an input file to compile! Type the following into a text file named main.c.
#include <stdio.h>
int main()
{
 printf("Hello, World!\n");
 return 0;
}
You can compile this and run from the command line with:
gcc main.c -o main && main
If done correctly while at a command line in the same folder as the source file, you will get the message:
Hello, World!
If you see this, then it means that the program compiled and ran successfully.
You see, the command gcc main.c -o main && main is actually two commands in one. The first part
gcc main.c -o main
tells the compiler to process it and create an executable file. The second part
main
Tells it to run the executable file. On Windows, this would run a program named “main.exe”. On Linux, the file is likely to be named simply “main”. Also, on Linux, you would need to write it as “./main” to execute it. This signals that the file you are trying to run is in the current directory.
How it works
Now that you have successfully ran the Hello World program, you might be wondering what it all means. Here is the same program with comments included.
#include <stdio.h> /*include the standard input and output library*/
int main() /*beginning of a function named main which returns an integer*/
{ /*opening bracket starting the function block*/
 printf("Hello, World!\n"); /*calling printf, the most useful function in the C Programming Language.*/
 return 0; /*Return the number zero to the operating system. This means no errors occurred.*/
} /*closing bracket ending the function block*/
Once you can get this program working, then the rest of the C source code samples in this book will work fine! They all use elements of the C Standard Library. The file “stdio.h” is one of the library files.
I will do my best to explain the usage of functions as they are introduced. However, for more information, it is better to go to an online reference such as cppreference.com for more information than I have included.
For example, you can find on there the usage of the printf family of functions. Arguably, printf is the most used function in C because of its ability to output strings of text and numbers to display any useful information to the user of the program. Without output, you would have no way of knowing whether your code was correct.
I do not use all of the functions in the standard library. In fact, I would say that most of the functions and features of the C language I have never learned because I never needed to. The reason for this will become more clear in Chapter 1 when I cover what I do best: writing code to generate integer sequences.
Chapter 1: Integer Sequences
An integer is a whole number. For example, 1,2,3,4,5 etc are all integers. Negative numbers like -15 or -23 are also integers.
Things that are not an integer include anything that comes with a decimal point. For example, Pi:
3.14159265358979323846
Or the Square root of 2.
1.41421356237309504880
Integers, specifically positive integers are the focus of this chapter. I will start with a code sample that generates all the integers up to 100.
Count 100
#include <stdio.h>
int main()
{
 int a=0;
 while(a<=100)
 {
  printf("%d ",a);
  a++;
 }
 return 0;
}
If done correctly, you will see the following in your terminal.
0 1 2 3 4 5 6 7 8 9 10 11 12 13 14 15 16 17 18 19 20 21 22 23 24 25 26 27 28 29 30 31 32 33 34 35 36 37 38 39 40 41 42 43 44 45 46 47 48 49 50 51 52 53 54 55 56 57 58 59 60 61 62 63 64 65 66 67 68 69 70 71 72 73 74 75 76 77 78 79 80 81 82 83 84 85 86 87 88 89 90 91 92 93 94 95 96 97 98 99 100
How this works is very simple. with int a=0; We define an integer named a that starts at 0. Then we set up a while conditional block defined by while(a<=100) which means that the following block will happen as long as a is less than or equal to 100.
Just like the main function, each block begins with a { and ends with a }. This is common for languages like C, C++, Java, and Javascript.
There are two statements in this block. The first is:
printf("%d ",a);
Says that we are going to print a decimal integer followed by a space. The second argument (or option) to the printf function is the variable ‘a’.
The next statement:
a++;
Is a short way of saying “add 1 to a”. You could just as easily write “a=a+1;” or “a+=1;”
Upon this foundation, all other integer sequence code is written. There are always these steps.
- Define the variables used
- Set up the looping conditionals
- One or more statements defining the math
One important misunderstanding about computer programming is that some people think it is related to algebra. Not in the slightest. I failed at algebra more times than I can count but this is not like that. As a computer programmer, I get to say what the variables are and how they change. Algebra is different because you are trying to discover what someone else decided a,b,c or x,y,z are. Where is the fun in that?!
But computer programming can be fun if you know how to write it. As you look at my next samples, you may begin to understand why I enjoy it.
The Powers of 2
The powers of 2 are an interesting sequence because of their application in computer science (computers work in the binary numeral system, not decimal) as well as biology. It is extremely easy to write a basic program to generate the sequence of the powers of 2.
#include <stdio.h>
int main()
{
 int a=0,b=32,c=1;
 while(a<=b)
 {
  printf("2 ^ %2d = %11d\n",a,c);
  a++;
  c+=c;
 }
 return 0;
}
This short program generates the powers of two sequence. It starts at 1 and doubles the number each time by adding it to itself. The output is as follows.
2 ^  0 =           1
2 ^  1 =           2
2 ^  2 =           4
2 ^  3 =           8
2 ^  4 =          16
2 ^  5 =          32
2 ^  6 =          64
2 ^  7 =         128
2 ^  8 =         256
2 ^  9 =         512
2 ^ 10 =        1024
2 ^ 11 =        2048
2 ^ 12 =        4096
2 ^ 13 =        8192
2 ^ 14 =       16384
2 ^ 15 =       32768
2 ^ 16 =       65536
2 ^ 17 =      131072
2 ^ 18 =      262144
2 ^ 19 =      524288
2 ^ 20 =     1048576
2 ^ 21 =     2097152
2 ^ 22 =     4194304
2 ^ 23 =     8388608
2 ^ 24 =    16777216
2 ^ 25 =    33554432
2 ^ 26 =    67108864
2 ^ 27 =   134217728
2 ^ 28 =   268435456
2 ^ 29 =   536870912
2 ^ 30 =  1073741824
2 ^ 31 = -2147483648
2 ^ 32 =           0
Everything looks nice here. I even aligned the digits of the output to make it beautiful. It is all fine until we get 2 to the 31st power. Why is it negative?! Why is 2^32 now 0?
I understand it because I know how integer sizes work on computers. An int type in the C language is usually a 32 bit integer and so it can only contain 32 bits (binary digits) which represent the sum of powers of two that can represent any integer up to that limit. However, because numbers are infinite, at some point data is lost and we end up back at zero.
For a complete understanding on the topic of the binary numeral system, I would probably have to write a whole book on it as well. However, for now, I will show you that through clever code writing, it is possible to break this limit and go far beyond this wall that the last program runs into.
The following program may scare you a little bit. It uses an array of decimal digits to represent a number instead of using the built in machine integers. However messy it looks, it certainly does the job.
Advanced Powers of 2
#include <stdio.h>
int main()
{
 int a=0,b=64;

 int x,y;
 #define length 1000
 int length2=20;
 char c[length];

 x=0;
 while(x<length)
 {
  c[x]=0;
  x++;
 }
 c[0]=1;

 while(a<=b)
 {
  printf("2 ^ %2d = ",a);
  a++;

  x=length2;
  while(x>0)
  {
   x--;
   printf("%d",c[x]);
  }
  printf("\n");

  y=0;
  x=0;
  while(x<=length2)
  {
   c[x]+=c[x];
   c[x]+=y;
   if(c[x]>9){y=1;c[x]-=10;}else{y=0;}
   x++;
  }
  if(c[length2]>0){length2++;}

 }
 return 0;
}
The output is the following:
2 ^  0 = 00000000000000000001
2 ^  1 = 00000000000000000002
2 ^  2 = 00000000000000000004
2 ^  3 = 00000000000000000008
2 ^  4 = 00000000000000000016
2 ^  5 = 00000000000000000032
2 ^  6 = 00000000000000000064
2 ^  7 = 00000000000000000128
2 ^  8 = 00000000000000000256
2 ^  9 = 00000000000000000512
2 ^ 10 = 00000000000000001024
2 ^ 11 = 00000000000000002048
2 ^ 12 = 00000000000000004096
2 ^ 13 = 00000000000000008192
2 ^ 14 = 00000000000000016384
2 ^ 15 = 00000000000000032768
2 ^ 16 = 00000000000000065536
2 ^ 17 = 00000000000000131072
2 ^ 18 = 00000000000000262144
2 ^ 19 = 00000000000000524288
2 ^ 20 = 00000000000001048576
2 ^ 21 = 00000000000002097152
2 ^ 22 = 00000000000004194304
2 ^ 23 = 00000000000008388608
2 ^ 24 = 00000000000016777216
2 ^ 25 = 00000000000033554432
2 ^ 26 = 00000000000067108864
2 ^ 27 = 00000000000134217728
2 ^ 28 = 00000000000268435456
2 ^ 29 = 00000000000536870912
2 ^ 30 = 00000000001073741824
2 ^ 31 = 00000000002147483648
2 ^ 32 = 00000000004294967296
2 ^ 33 = 00000000008589934592
2 ^ 34 = 00000000017179869184
2 ^ 35 = 00000000034359738368
2 ^ 36 = 00000000068719476736
2 ^ 37 = 00000000137438953472
2 ^ 38 = 00000000274877906944
2 ^ 39 = 00000000549755813888
2 ^ 40 = 00000001099511627776
2 ^ 41 = 00000002199023255552
2 ^ 42 = 00000004398046511104
2 ^ 43 = 00000008796093022208
2 ^ 44 = 00000017592186044416
2 ^ 45 = 00000035184372088832
2 ^ 46 = 00000070368744177664
2 ^ 47 = 00000140737488355328
2 ^ 48 = 00000281474976710656
2 ^ 49 = 00000562949953421312
2 ^ 50 = 00001125899906842624
2 ^ 51 = 00002251799813685248
2 ^ 52 = 00004503599627370496
2 ^ 53 = 00009007199254740992
2 ^ 54 = 00018014398509481984
2 ^ 55 = 00036028797018963968
2 ^ 56 = 00072057594037927936
2 ^ 57 = 00144115188075855872
2 ^ 58 = 00288230376151711744
2 ^ 59 = 00576460752303423488
2 ^ 60 = 01152921504606846976
2 ^ 61 = 02305843009213693952
2 ^ 62 = 04611686018427387904
2 ^ 63 = 09223372036854775808
2 ^ 64 = 18446744073709551616
The concept of an array is really easy to explain. An array is a list of numbers. In the program above, variable ‘c’ is not one number but a list of 1000 numbers. With #define length 1000 we declared a compiler constant representing the maximum length the array can be. With int length2=20; we declared the length of the number of digits we want printed. Finally, with char c[length]; we declared the array of integers named ‘c’ rather than just one integer.
If you are wondering why ‘c’ is defined as type “char” instead of “int”, that is just to save memory. A char is an 8 bit integer instead of the usual 32 bit. For our purpose in this program, this is more than enough.
The first loop in this code initializes the entire array with zeros. The x variable is used only as an index variable but has no special meaning on its own.
 x=0;
 while(x<length)
 {
  c[x]=0;
  x++;
 }
 c[0]=1;
Literally it is setting everything from c[0] to c[999] to 0. Then it sets c[0] equal to 1; This lowest element represents the ones place. Elements 1,2,3 and so on represent the tens, hundred, thousands, etc.
Most parts of this program are still the same as the simple one. Variables ‘a’ and ‘b’ control how many times the big loop goes.
  x=length2;
  while(x>0)
  {
   x--;
   printf("%d",c[x]);
  }
  printf("\n");
By starting at length2, we decide at what point to begin printing the digits. Each time, ‘x’ is decreased by 1 and we print the current element represented by c[x].
And finally, the real magic happens in this part.
  y=0;
  x=0;
  while(x<=length2)
  {
   c[x]+=c[x];
   c[x]+=y;
   if(c[x]>9){y=1;c[x]-=10;}else{y=0;}
   x++;
  }
  if(c[length2]>0){length2++;}
Variable ‘y’ is used as a “carry” in the addition process. We are starting at the bottom of the array and adding each digit to itself. Then we add the carry variable to the current digit.
Then, we have an “if statement” to execute if the digit goes higher than 9. If this happens, we subtract ten from it and then set the carry to 1. Otherwise, we set the carry back 0 zero.
Finally at the end of this loop is a conditional that automatically increases the length 2 variable if the carry has caused it to be higher than zero. This makes an automatically expanding list of decimal digits.
As you might guess, I spent many hours perfecting this powers of two program. I wanted it fast but I also tried to make it clear and readable. For an experienced programmer, this is nothing, but it is the kind of code that makes non-programmers confused and they think I am a genius.
And maybe I am, but the point is that I only instructed the computer to do what I already know how to do on paper and in my mind. The same process of addition applies when adding a deposit to a check register for example.
The Prime Numbers
The prime numbers are a fun study for many people. The definition of a prime number is that it has exactly two factors (the number itself and 1). For example 7 is a prime number because it is not divisible by anything else other than 1. 9 is not prime because 3 times 3 equals 9.
#include <stdio.h>
int main()
{
 int x,y;
 #define length 1000
 char c[length];

 x=0;
 while(x<length)
 {
  c[x]=0;
  x++;
 }
 c[0]=1;

 printf("2 ");
 x=3;
 while(x<length)
 {
  printf("%d ",x);
  y=x;
  while(y<length)
  {
   c[y]=1;
   y+=x;
  }
  while(x<length && c[x]>0){x+=2;}
 }

 return 0;
}
This program is relatively short considering that it finds all the prime numbers less than 1000 very efficiently.
2 3 5 7 11 13 17 19 23 29 31 37 41 43 47 53 59 61 67 71 73 79 83 89 97 101 103 107 109 113 127 131 137 139 149 151 157 163 167 173 179 181 191 193 197 199 211 223 227 229 233 239 241 251 257 263 269 271 277 281 283 293 307 311 313 317 331 337 347 349 353 359 367 373 379 383 389 397 401 409 419 421 431 433 439 443 449 457 461 463 467 479 487 491 499 503 509 521 523 541 547 557 563 569 571 577 587 593 599 601 607 613 617 619 631 641 643 647 653 659 661 673 677 683 691 701 709 719 727 733 739 743 751 757 761 769 773 787 797 809 811 821 823 827 829 839 853 857 859 863 877 881 883 887 907 911 919 929 937 941 947 953 967 971 977 983 991 997
Like my powers of two program, it uses an array named ‘c’. However, this time we are using the array as indexes in a prime finding process called the Sieve of Eratosthenes.
We are simply going through the array each time a prime number is found and then marking each index as a multiple of that number. Afterwards, the index goes to the next element which is still a zero, meaning that no factors have been found for this number.
Conclusion
The examples I have added in this chapter have shown the required elements of writing effective code. Knowing how to set integer variables (or arrays of them) is required for generating integer sequences. I can also add programs to this chapter for other sequences upon request if anyone has a sequence that they think is worth including.
Chapter 2: Graphics
While most of the focus of this book is about generating text information, such as the integer sequences of Chapter 1, there is a lot more potential that you may not realize at first. If we consider that all programming, scripting, and markup languages are created using text, it leads to the idea that we can use C in combination with other languages to generate pictures!
For my next example, I will be using SVG which stands for Scalable Vector Graphics. For more information on it, I highly recommend reading the specification.
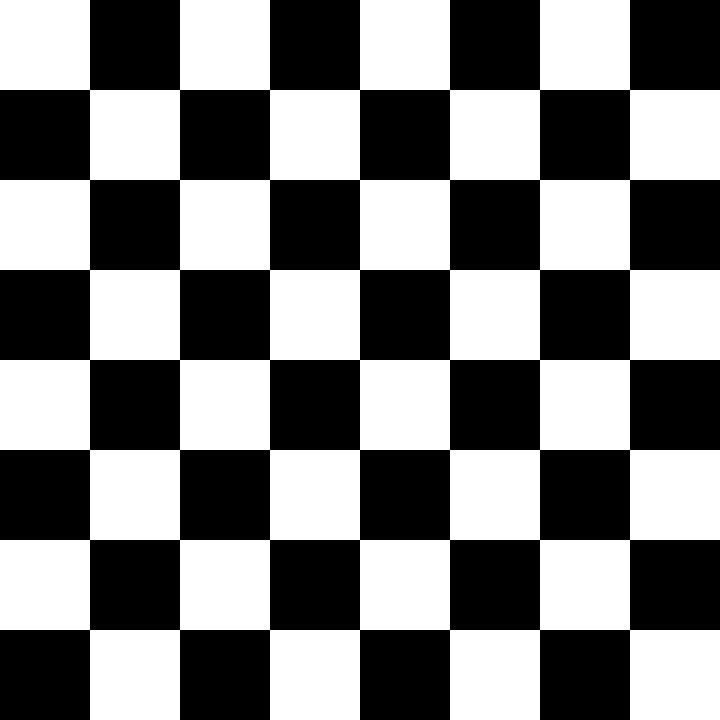
SVG Checkerboard
#include <stdio.h>
int main()
{
 int width=720,height=720;
 int x=0,y=0;
 int index=0,index1=0;
 int rect_width=90,rect_height=90;

 printf("<svg width=\"%d\" height=\"%d\">\n",width,height);

 printf("<rect x=\"%d\" y=\"%d\" width=\"%d\" height=\"%d\" style=\"fill:#FFFFFF;\" />\n",x,y,width,height);

 y=0;
 while(y<height)
 {
  index1=index;
  x=0;
  while(x<width)
  {
   if(index==1)
   {
    printf("<rect x=\"%d\" y=\"%d\" width=\"%d\" height=\"%d\" style=\"fill:#000000;\" />\n",x,y,rect_width,rect_height);
   }
   index^=1;
   x+=rect_width;
  }
  index=index1^1;
  y+=rect_height;
 }

 printf("</svg>\n");

 return 0;
}
The program produces the following code
<svg width="720" height="720">
<rect x="0" y="0" width="720" height="720" style="fill:#FFFFFF;" />
<rect x="90" y="0" width="90" height="90" style="fill:#000000;" />
<rect x="270" y="0" width="90" height="90" style="fill:#000000;" />
<rect x="450" y="0" width="90" height="90" style="fill:#000000;" />
<rect x="630" y="0" width="90" height="90" style="fill:#000000;" />
<rect x="0" y="90" width="90" height="90" style="fill:#000000;" />
<rect x="180" y="90" width="90" height="90" style="fill:#000000;" />
<rect x="360" y="90" width="90" height="90" style="fill:#000000;" />
<rect x="540" y="90" width="90" height="90" style="fill:#000000;" />
<rect x="90" y="180" width="90" height="90" style="fill:#000000;" />
<rect x="270" y="180" width="90" height="90" style="fill:#000000;" />
<rect x="450" y="180" width="90" height="90" style="fill:#000000;" />
<rect x="630" y="180" width="90" height="90" style="fill:#000000;" />
<rect x="0" y="270" width="90" height="90" style="fill:#000000;" />
<rect x="180" y="270" width="90" height="90" style="fill:#000000;" />
<rect x="360" y="270" width="90" height="90" style="fill:#000000;" />
<rect x="540" y="270" width="90" height="90" style="fill:#000000;" />
<rect x="90" y="360" width="90" height="90" style="fill:#000000;" />
<rect x="270" y="360" width="90" height="90" style="fill:#000000;" />
<rect x="450" y="360" width="90" height="90" style="fill:#000000;" />
<rect x="630" y="360" width="90" height="90" style="fill:#000000;" />
<rect x="0" y="450" width="90" height="90" style="fill:#000000;" />
<rect x="180" y="450" width="90" height="90" style="fill:#000000;" />
<rect x="360" y="450" width="90" height="90" style="fill:#000000;" />
<rect x="540" y="450" width="90" height="90" style="fill:#000000;" />
<rect x="90" y="540" width="90" height="90" style="fill:#000000;" />
<rect x="270" y="540" width="90" height="90" style="fill:#000000;" />
<rect x="450" y="540" width="90" height="90" style="fill:#000000;" />
<rect x="630" y="540" width="90" height="90" style="fill:#000000;" />
<rect x="0" y="630" width="90" height="90" style="fill:#000000;" />
<rect x="180" y="630" width="90" height="90" style="fill:#000000;" />
<rect x="360" y="630" width="90" height="90" style="fill:#000000;" />
<rect x="540" y="630" width="90" height="90" style="fill:#000000;" />
</svg>
There is no mystery as to why it works the way it does. The location, size, and color of each square is a number. If everything is a number and numbers are represented by a text language like SVG to show pictures in a web browser, then we can create pictures with something as simple as printf statements in the C programming language. Of course, you usually have to copy and paste the text into a file and save it with the “.svg” extension for most programs to be able to read it.
The next method I will be using to generate a picture does not use vector graphics at all. Instead, it operates a large array of 32 bit integers as if they were pixels. The following program calls several different functions that I wrote as part of my BBM (Binary Bit Map) project.
Portable Bitmap Checkerboard
#include <stdio.h>
#include <stdlib.h>
#include <stdint.h>
#include "bbm.h"
int main()
{
 uint32_t *p=NULL; /*The pointer to the pixels*/
 int width=720,height=720; /*The size of the image.*/
 int square_size=90; /*size of each square in the checkerboard that will be created*/
 uint32_t colors[]={0x000000,0xFFFFFF};

 p=BBM_malloc(width,height);

 chastity_checker(p,width,height,square_size,colors[1],colors[0]);

 BBM_SavePBM(p,width,height,"image.pbm");

 BBM_free(p);

 return 0;
}
If you take a look at the source, you will see that it includes a file named “bbm.h”. This is a small file that I wrote with some utility functions. The BBM project was designed to be an entire library that created pictures of black and white by writing to image files.
To properly run this code, I will also included the source below to the “bbm.h” file and all the functions which are called in the main function from above. If you copy this to a file named “bbm.h” and place it in the same folder as your main source file, it will work correctly.
Don’t worry if you don’t understand it all right now, it took me months of work to get the formulas for these just right.
/*
# Binary Bit Map

This C library file was created for my book, Chastity's Code Cookbook. It demonstrates that it is possible to create image files with only the C standard library.
All code was written entirely with by Chastity White Rose. The design is focused on black and white images only, but the format used for pixels is 32 bit unsigned integers.
This code is therefore extendable to use for any colors if I wish to expand it.
*/

/*
 Allocates memory for the pixels which should be 4 bytes/32 bits per pixel. Uses standard library function malloc.
 uint32_t is a 32 bit unsigned integer type. This is why stdint.h is always included.
 I never need more than 32 bits and any more would waste memory.
*/
uint32_t* BBM_malloc(uint32_t width,uint32_t height)
{
 uint32_t *pointer;
 int length=width*height;
 pointer=(uint32_t*)malloc(length*sizeof(*pointer));
 if(pointer==NULL){printf("Error: malloc failed,\n");}
 return pointer;
}

/*
frees the memory the pointer points to, but only if the pointer is not already NULL.
*/
void BBM_free(uint32_t *pointer)
{
 if(pointer!=NULL){free(pointer);pointer=NULL;}
}

/*
 The function that saves the pixels to a PBM file.
 0 is black and 1 is White.
 Each byte contains 8 pixels. One per bit.
*/
void BBM_SavePBM_Pixels(uint32_t *p,uint32_t width,uint32_t height,FILE* fp)
{
 uint32_t x,y,pixel,r,g,b,gray,bitcount,bits,bpp=1;

 y=0;
 while(y<height)
 {
  bitcount=0;
  bits=0;
  x=0;
  while(x<width)
  {
   pixel=p[x+y*width];
   r=(pixel&0xFF0000)>>16;
   g=(pixel&0x00FF00)>>8;
   b=(pixel&0x0000FF);
   gray=(r+g+b)/3;
   gray>>=8-bpp; gray^=1;
   bits<<=bpp;
   bits|=gray;
   bitcount+=bpp;
   x++;
   while(bitcount>=8)
   {
    fputc(bits,fp);
    bitcount-=8;
   }
  }

  /*If width is not a multiple of 8 pad the bits to a full byte*/
  while(bitcount!=0)
  {
   bits<<=1;
   bitcount++;
   if(bitcount==8)
   {
    fputc(bits,fp);
    bitcount=0;
   }
  }
  y++;
 }

}

/*
Saves to PBM. My favorite already existing format because of it's simplicity. Next to my own BBM format this is the most efficient uncompressed storage of black and white pixels I have seen, unless there is another format I don't know about.
*/
void BBM_SavePBM(uint32_t *p,uint32_t width,uint32_t height,const char* filename)
{
 FILE* fp;
 fp=fopen(filename,"wb+");
 if(fp==NULL){printf("Failed to create file \"%s\".\n",filename); return;}
 else{/*printf("File \"%s\" opened.\n",filename);*/}
 fprintf(fp,"P4\n"); fprintf(fp,"%d %d\n",width,height);

 BBM_SavePBM_Pixels(p,width,height,fp);

 fclose(fp);
 /*printf("Saved to file: %s\n",filename);*/
}

/*
Code for filling the image with a checkerboard. This is my most precious of programming creations!
*/
void chastity_checker(uint32_t *p,uint32_t width,uint32_t height,uint32_t square_size,uint32_t color0,uint32_t color1)
{
 uint32_t x,y=0,index=0,index1,bitcountx,bitcounty=0;
 while(y<height)
 {
  index1=index;
  bitcountx=0;
  x=0;
  while(x<width)
  {
   if(index==0){p[x+y*width]=color0;}
    else       {p[x+y*width]=color1;}
   bitcountx+=1;if(bitcountx==square_size){bitcountx=0;index^=1;}
   x+=1;
  }
  index=index1;
  bitcounty+=1;if(bitcounty==square_size){bitcounty=0;index^=1;}
  y+=1;
 }
}
The image file is a PBM (Portable Bit Map). It is a very simple but also well documented format. I learned this format so that I can write an array of pixels to a binary file.
Let me briefly explain the function of the various functions.
BBM_malloc allocates memory for the amount of pixels we need. It calls malloc, which is a C standard library function. However, I wrote the functiont automatically print an error message if memory allocation fails.
BBM_free deletes the memory allocation with the C library function free if it points to anything valid.
chastity_checker is the function I am most proud of. It draws a checkboard entirely with some index variables and loops to fill any entire image with a checkerboard. It allows for theoretically using any colors, but in this example, we are outputting to a format that only supports black and white.
BBM_SavePBM does a lot of things. It creates and opens a file, writes the initial header of the format. calls another function I wrote, BBM_SavePBM_Pixels, to actually write the pixels, then closes the file.
Understanding the nature of everything that is in the functions requires knowing on a deep level how to use the bitwise AND, OR, XOR, and left and right bit shifts. Without a working knowledge of the Binary Numeral System, you will not at first understand what is happening here.
However, if you have some understanding of the C library, you will understand the usage of the functions relating to file creation and output.
Converting the Image File
The PBM file created will not be readable by most programs. You can instead use some other tools to convert it. You can use the graphical image editor GIMP to load and export it to a different format.
However, what I do is use ImageMagick from the command line.
magick image.pbm image.png
The end result is that the image looks like this:
You can also achieve the same result with the tool FFmpeg.
ffmpeg -i image.pbm image.png
Graphics Fundamentals
By now you might be thinking: “Creating image files to display in other programs is great, but can’t I write a program to display a picture without writing it to a write for a different program to view?”
And it is a very good question. The short answer is yes, but the problem lies with the fact that the C library installed along with the C compiler does not contain anything related to graphics. At the time it was written, computer graphics as we know them today didn’t exist.
You might wonder how video games are created using the C and C++ languages all the time. There are two main ways to create graphics directly in a windowed desktop application. There is the hard way and the easy way.
The Hard Way
The hard way, and for many years the only way, to create a window and draw things onto it is to use the native API for your operating system. I have never learned how to do this because I am only interested in writing software that works on Linux and Windows equally well.
But what is Linux? Linux is an operating system like Windows or MacOS is. However, it is free and open source! Technically Linux is a kernel and the operating system consists of various component, which includes the X Window System and different Desktop Environments.
But if you don’t know what Linux is, I am not the best qualified to explain it. However, I have been using Linux for 20 years and I know a thing or two about getting almost any of my C programs compiled on Linux. I can also play Chess on lichess.org just as well on Linux as I can Windows.
The specific version of Linux I use is called Debian. I would suggest you give it a try if you have an old computer that has Windows but is running too slow.
https://www.debian.org/
I know that is a lot of information to take in right now but I mention it because programming on Linux is easier than it is on Windows. That is because the built in package manager lets you install SDL directly without even opening up your web browser and visiting the website! For example, on a Debian or Ubuntu based system, this command will install everything you need to get started with my example SDL program in the next section.
sudo apt-get install libsdl2-dev
The Easy Way
The easy way to make graphical applications and video games is to use SDL. SDL stands for Simple Directmedia Layer. It is a library of functions written by people much smarter than me which act as a layer between what the programmer wants to do and communicating with the operating system to achieve the result.
I will provide you a short sample of a program written with SDL just so you get an idea how it looks. In a later chapter, I will have to walk you through some things that you need to know to install and compile programs written using the library.
SDL Square Target
#include <stdio.h>
#include <SDL.h>
int width=720,height=720;
int loop=1;
SDL_Window *window;
SDL_Surface *surface;
SDL_Event e;
int main(int argc, char **argv)
{
 int x,y;
 int colors[]={0x000000,0xFFFFFF},index=0;
 int rect_width=30,rect_height=30;
 SDL_Rect rect;

 if(SDL_Init(SDL_INIT_VIDEO))
 {
  printf( "SDL could not initialize! SDL_Error: %s\n",SDL_GetError());return -1;
 }
 window=SDL_CreateWindow("SDL Program",SDL_WINDOWPOS_CENTERED,SDL_WINDOWPOS_CENTERED,width,height,SDL_WINDOW_SHOWN );
 if(window==NULL){printf( "Window could not be created! SDL_Error: %s\n", SDL_GetError() );return -1;}
 surface = SDL_GetWindowSurface( window ); /*get surface for this window*/

 /*drawing section begin*/

 rect.w=width;
 rect.h=height;

 x=0;
 y=0;

 while(rect.w>0)
 {
  rect.x=x;
  rect.y=y;
  SDL_FillRect(surface,&rect,colors[index]);
  x+=rect_width;
  y+=rect_height;
  rect.w-=rect_width*2;
  rect.h-=rect_height*2;
  index^=1;
 }

 /*drawing section end*/

 SDL_UpdateWindowSurface(window);

 printf("SDL Program Compiled Correctly\n");

 while(loop)
 {
  while(SDL_PollEvent(&e))
  {
   if(e.type == SDL_QUIT){loop=0;}
   if(e.type == SDL_KEYUP)
   {
    if(e.key.keysym.sym==SDLK_ESCAPE){loop=0;}
   }
  }
 }
 SDL_DestroyWindow(window);
 SDL_Quit();
 return 0;
}
On my Debian Linux system, I use this command to compile and run this program.
gcc -Wall -ansi -pedantic main.c -o main `sdl2-config --cflags --libs` -lm && ./main
When you successfully compile and run the program, it will look something like this!

If you look at the source code, you will see that it has a lot of code that must be done before we even get to the drawing section that I marked with comments at the beginning and end.
When I first started using SDL version 2, it did not have support for drawing anything other than rectangles. There is an advanced way to do with by alternative means but that is beyond the scope of this book.
However, rectangles are all you need to make an entire Tetris game! I wrote all the code for my own game and published it on Steam.
https://store.steampowered.com/app/1986120/Chaste_Tris/
I will admit the code was a complete wreck and the game is not as advanced as the officially licensed Tetris games. However, as a proof of concept, and for the sake of making a video game so I can cross it off my bucket list, I did it.
Before you leave this chapter, I want you to know more than one thing, the square is a special case of a rectangle where the width and height are the same. My obsession with the games Tetris and Chess most certainly is because I am obsessed with the shape of the square! Therefore, all of my graphics programming experience came about from my desire to draw perfect checkerboards on the computer. I have succeeded!
Chapter 3: Back to Binary Basics
In chapter 1 I showed you my favorite integer sequences and how easy it is to generate them with a bit of math and printf statements in the C Programming Language. However, a lot of the code in my powers of two program and also the Portable Bit Map Checkerboard program do not make sense unless you understand that nature of the binary numeral system. To help illustrate it, I have created a small program which displays the numbers 0 to 15.
Binary to Decimal Counting 4 Bits
#include <stdio.h>
#include "binlib.h"
int main()
{
 int a=0;
 while(a<16)
 {
  printf("%s %02d\n",int_to_binary_string(a,4),a);
  a++;
 }
 return 0;
}
The included file “binlib.h” contains this function:
#define ulength 100  /*the size of the array to be defined next*/
char u[ulength]; /*universal array for my integer to binary string function*/

char* int_to_binary_string(unsigned int i,int width)
{
 char *s=u+ulength;
 *s=0;
 do
 {
  s--;
  *s=i&1;
  i>>=1;
  *s+='0';
  width--;
 }
 while(i!=0 || width>0);
 return s;
}
When run, the program displays this:
0000 00
0001 01
0010 02
0011 03
0100 04
0101 05
0110 06
0111 07
1000 08
1001 09
1010 10
1011 11
1100 12
1101 13
1110 14
1111 15
The numbers on the left are the binary version and the numbers on the right are the decimal numbers you have been taught all your life by human society. The truth is, there are as many different bases to use for a number system as there are numbers themselves.
By looking at the chart above, you can probably figure out how binary works already, but in case you are stuck, here is another small sample program and its output to drive the point even clearer.
Left Shift Example
#include <stdio.h>
#include "binlib.h"
int main()
{
 int a=1;
 while(a!=0)
 {
  printf("%s %10u\n",int_to_binary_string(a,32),a);
  a<<=1;
 }
 return 0;
}
The output of this program is:
00000000000000000000000000000001          1
00000000000000000000000000000010          2
00000000000000000000000000000100          4
00000000000000000000000000001000          8
00000000000000000000000000010000         16
00000000000000000000000000100000         32
00000000000000000000000001000000         64
00000000000000000000000010000000        128
00000000000000000000000100000000        256
00000000000000000000001000000000        512
00000000000000000000010000000000       1024
00000000000000000000100000000000       2048
00000000000000000001000000000000       4096
00000000000000000010000000000000       8192
00000000000000000100000000000000      16384
00000000000000001000000000000000      32768
00000000000000010000000000000000      65536
00000000000000100000000000000000     131072
00000000000001000000000000000000     262144
00000000000010000000000000000000     524288
00000000000100000000000000000000    1048576
00000000001000000000000000000000    2097152
00000000010000000000000000000000    4194304
00000000100000000000000000000000    8388608
00000001000000000000000000000000   16777216
00000010000000000000000000000000   33554432
00000100000000000000000000000000   67108864
00001000000000000000000000000000  134217728
00010000000000000000000000000000  268435456
00100000000000000000000000000000  536870912
01000000000000000000000000000000 1073741824
10000000000000000000000000000000 2147483648
The binary system works exactly like you would expect given the chart above. Each bit is either 0 (off) or it is a 1 which represents that a specific power of two is turned “on”.
For example, add this function to “binlib.h”
int binary_string_to_int(char *s)
{
 int i=0;
 char c;
 while( *s == ' ' || *s == '\n' || *s == '\t' ){s++;} /*skip whitespace at beginning*/
 while(*s!=0)
 {
  c=*s;
  if( c == '0' || c == '1' ){c-='0';}
  else if( c == ' ' || c == '\n' || c == '\t' ){return i;}
  else{printf("Error: %c is not a valid character for base 2.\n",c);return i;}
  i<<=1;
  i+=c;
  s++;
 }
 return i;
}
And then the following program will display my age!
Binary Age Example
#include <stdio.h>
#include "binlib.h"
int main()
{
 printf("My name is Chastity and I am %d years old!\n",binary_string_to_int("100110"));
 return 0;
}
The result is:
My name is Chastity and I am 38 years old!
This works because we are literally sending a binary string which represents 32+0+0+4+2+0.
Perhaps you are starting to understand how it works by now. If not, don’t worry because technically you don’t need to know binary to be a computer programmer. but some advanced techniques in graphics programming are not possible without a working knowledge of how many bits a data type is and how to modify individual bits.
Why is Binary Used?
But perhaps the larger question is why Binary is used in computers. Basically the idea is that states of on/off or low/hi voltage are how electricity is measured. Once you understand that everything in the world can be represented by a number and that Binary is one such system to represent numbers, you can see why it is so popular in computer hardware and software.
Anyhow, welcome to the art of computer programming, where black and white thinking really does help you! Or perhaps I should say, welcome to autism!
The Bitwise Operations
There are 5 bitwise operations which operate on the bits of data in a computer. For the purpose of demonstration, it doesn’t matter which number the bits represent at the moment. This is because the bits don’t have to represent numbers at all but can represent anything described in two states. Bits are commonly used to represent statements that are true or false. For the purposes of this section, the words AND, OR, XOR are in capital letters because their meaning is only loosely related to the Englist words they get their name from.
Bitwise AND Operation
0 AND 0 == 0
0 AND 1 == 0
1 AND 0 == 0
1 AND 1 == 1
Think of the bitwise AND operation as multiplication of single bits. 1 times 1 is always 1 but 0 times anything is always 0. That’s how I personally think of it. I guess you could say that something is true only if two conditions are true. For example, if I go to Walmart AND do my job then it is true that I get paid.
Bitwise OR Operation
0 OR 0 == 0
0 OR 1 == 1
1 OR 0 == 1
1 OR 1 == 1
The bitwise OR operation can be thought of as something that is true if one or two conditions are true. For example, it is true that playing in the street will result in you dying because you got run over by a car. It is also true that if you live long enough, something else will kill you. Therefore, the bit of your impending death is always 1.
Bitwise XOR Operation
0 XOR 0 == 0
0 XOR 1 == 1
1 XOR 0 == 1
1 XOR 1 == 0
The bitwise XOR operation is different because it isn’t really used much for evaluating true or false. Instead, it is commonly used to invert a bit. For example, if you go back to the source of my graphics programs in Chapter 2, you will see that most of those programs contain the statement:
index^=1;
If you look at my XOR chart above, you will see that using XOR of any bit with a 1 causes the result to be the opposite of the original bit. In the context of those programs, the index variable is meant to be 0 to represent black and 1 to represent white. The XOR operation is the quickest way to achieve this bit inversion. In fact, in all my years of programming, that’s pretty much the only thing I have used it for!
Bitwise Left and Right Shift Operations
Consider the case of the following 8 bit value:
00001000
This would of course represent the number 8 because a 1 is in the 8’s place value. We can left shift or right shift.
00001000 ==  8 : is the original byte

00010000 == 16 : after left shift
00000100 ==  4 : after right shift
Left and right shift operations allow us to multiply or divide a number by 2 by taking advantage of the base 2 system. These shifts are essential in graphics programming because sometimes to need to extract the red, green, or blue values separately out of their 24 bit representation. For example, consider this code:
   pixel=p[x+y*width];
   r=(pixel&0xFF0000)>>16;
   g=(pixel&0x00FF00)>>8;
   b=(pixel&0x0000FF);
The first statement gets the pixel out of an array of data which is indexed by x and y geometric coordinates. This will be a 24 bit value, or in some cases 32 bit with the highest 8 bits representing the alpha or transparency level.
variables r,g,b represent red, green, and blue. With clever use of bitwise AND operations and right shifting by the correct number of bits, it is possible to extract just that color component to be modified. Without the ability to do this, my graphics animations and my Tetris game would never have been possible. The colors had to be exactly sent to the drawing functions. This is true not just for SDL but using any graphical system involving colors.
Learning More
I know I covered a lot in this chapter but I encourage you to learn about the binary numeral system and its close cousin the hexadecimal system. If you do an online search, you will find courses, tutorials, and videos by millions of people who can probably explain these same concepts in a way that you understand better if you are still confused after reading this chapter!
